How to Upload a Story
Manually upload a story to share with your Group — including text content, attached media files, and publication settings. Uploading your first story takes about ten minutes once your media files are ready.
Looking for RSS uploads?
If your Outlet publishes stories through a content management system with an RSS feed, you can streamline the upload process by importing stories directly from your feed. See How to Upload Stories with RSS for details.
Before You Begin
You will need:
- A Plucky Wire account with a verified Outlet (see Join an Outlet)
- Membership in at least one Group (see Join a Group)
- Your story content ready (headline, body text, and any media files you want to include)
Note
Your Outlet must have upload permissions within your Group. If you don't see the Upload option in your navigation, contact your Group administrator.
Instructions
Navigate to Upload
-
Log in to your Plucky Wire account.
-
Go to the Upload page at https://wire.pluckyworks.org/upload/.
You can also click Upload in the navigation menu at the top of any page.
-
If you belong to multiple Groups, select the Group you want to share the story with from the dropdown at the top of the page.
Fill Out the Story Details
Fill in the required fields at minimum; the optional fields help other Outlets find, attribute, and reuse your story.
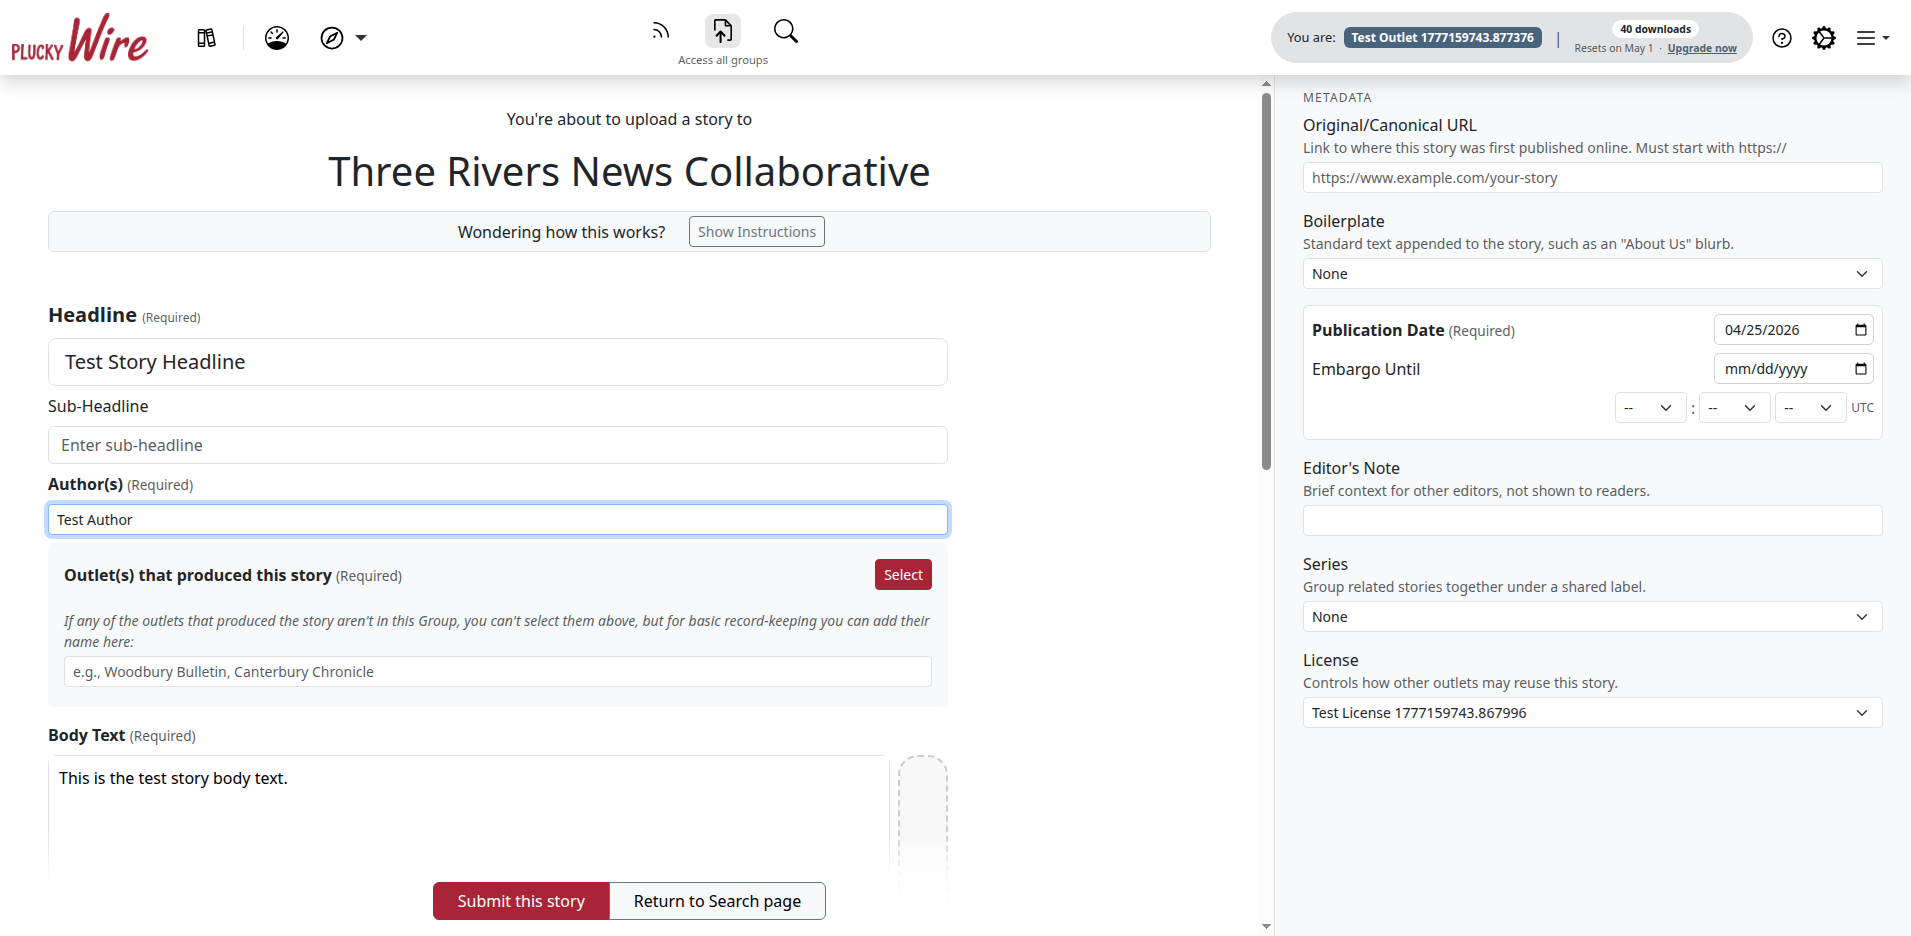
| Field | Required? | What to enter |
|---|---|---|
| Headline | Required | The main title for the story as it will appear on Plucky Wire. |
| Author(s) | Required | All authors, separated by commas (e.g., "Jane Smith, John Doe"). |
| Publication Date | Required | The date the story was originally published. |
| Outlet(s) that produced this story | Required | The Outlets that should be credited on the story. Click Select to open the picker — see Select Partner Outlets below. |
| Body Text | Required | The story body. Click in the rich text editor to write or paste; the formatting toolbar handles bold, italics, headings, lists, links, and block quotes. Pastes from Word and Google Docs preserve basic formatting and clean up the rest. |
| License | Required | The terms under which other Outlets can use your story. Pick from the dropdown — your Group administrator sets up the available options. |
| Sub-Headline | Optional | A secondary headline or additional context. |
| Original/Canonical URL | Optional | The URL where the story was first published (the canonical URL). Helps other Outlets properly attribute the source. Must start with https://. |
| Outside contributors | Optional | Names of contributing Outlets that aren't part of your Group, separated by commas. The field sits under the Outlet picker. Useful for one-off collaborations with external partners — but those Outlets won't get analytics on how the story performs unless they register and join the Group. |
| Editor's Note | Optional | Context that other Outlets should know — background information for editors or special attribution requirements. Not shown to readers. |
| Series | Optional | If your story is part of an ongoing series, select it from the dropdown. Helps other Outlets discover related stories you've written. |
| Boilerplate | Optional | Select a Boilerplate to automatically include standard text — typically information about your Outlet or Group — at the beginning and/or end of the story when other Outlets download it. |
| Tags | Optional | If your Group uses tags, click Select next to the Tags label to categorize your story by location (geographical), treatment (editorial), or subject (topical). The Tags section only appears if your Group administrator has enabled tags. |
| Embargo Until | Optional | A date and time when the story should become available. Embargoed stories are visible in search results but cannot be previewed or downloaded until the embargo expires. Useful when you want to post a story to your feeds but keep exclusivity for a day or two. You can still edit embargoed stories before the release date. |
Warning
Don't paste images into the body text editor. Images left inside the body are stripped when the story is saved. Drag any pasted image from the editor into the sidebar drop zone — the area on the page that accepts files when you drag them onto it — to attach it as media instead. A popup will offer to save a cutline along with the image.
Select Partner Outlets
The Outlets you select are credited on the story and tracked in its analytics.
-
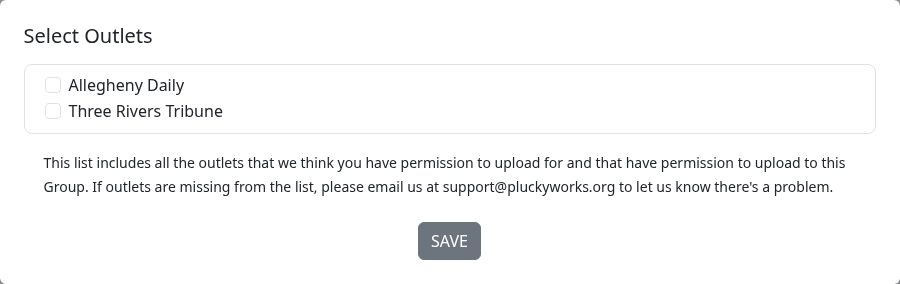
Click Select next to the Outlet(s) that produced this story label to open the Outlet selection modal — a pop-up window that appears over the page.
-
Check the boxes next to each Outlet that should be credited on this story. Typically, that's just your own Outlet; if the story was co-published with other Outlets in your Group, select those as well.
-
Click SAVE to close the modal.
The selected Outlets appear as badges below the button.
Info
If an Outlet has reached its upload limit for the current period, it will be greyed out in the Select Outlets modal with a note explaining why. Contact your Group administrator to raise the limit, or wait until the next period.
Add Media Attachments
You can attach images, audio files, video files, and PDFs to your story. Other Outlets can download these files when they reprint your story.
| Type | Formats | Max Size |
|---|---|---|
| Images | JPEG, PNG, GIF, WebP, HEIC, BMP, TIFF | 200 MB |
| Audio | MP3, WAV, OGG, AAC, M4A, FLAC, WebM | 200 MB |
| Video | MP4, WebM, OGG, AVI, MPEG, QuickTime | 200 MB |
| Documents | 200 MB |
-
Drag and drop files into the upload area, or click Select files to browse.
-
Wait for the upload to complete. A progress indicator shows the upload status.
-
Add a Cutline (caption) for each file once it has uploaded. Cutlines help other Outlets understand the context.
Note
Images are automatically converted to JPEG format for consistency. Audio and video files may take a few seconds to process after uploading; longer files take proportionally longer.
Add Embedded Media
If your story includes embedded content from external services — YouTube, Vimeo, Spotify, Datawrapper, DocumentCloud, Podbean, or C-SPAN — add them in the Embedded Media section so other Outlets can include them in their reprints.
C-SPAN support covers Road to the Capitol only
C-SPAN embeds are only supported for videos in C-SPAN's Road to the Capitol series. Paste the event page URL — for example, https://www.c-span.org/road-capitol/event/?id=444357. Classic C-SPAN /video/ and /clip/ links are not supported.
-
Paste the URL of the embedded content (e.g., a YouTube video URL) into the URL field.
-
Optionally, type a cutline describing the embed in the Cutline field.
-
Click Add Embed. The embed appears in the Embedded Media Preview area below.
-
Repeat for additional embeds.
Submit Your Story
-
Review all the information you've entered.
-
Click Submit this story at the bottom of the page.
-
If successful, you'll be redirected to your new story's page. If there are issues you need to address, you'll be sent back to the top of the page, where an error banner will list what needs your attention.
Note
Stories are immediately visible to other Outlets in your Group once submitted (unless embargoed). Double-check your content before uploading.
What Happens Next
Once your story is submitted:
- It appears immediately in the search results of every other Outlet in your Group, unless you set an embargo date.
- Other Outlets can preview, download, and reprint the story under the License you selected.
- Any media files you attached are available for those Outlets to download alongside the story.
- You can return to your story page at any time to edit it, or to see download counts per Outlet at the bottom of the page.
Next Steps
After uploading your story:
- Find stories shared by other Outlets in your Group
- Open your story page to see which Outlets have downloaded it — download counts appear at the bottom of every story
Troubleshooting
-
"A story with this headline already exists" error: You may have already uploaded this story, or a Group admin uploaded it for you. (Stories are considered identical if they have the same Outlet, Publication Date, and Headline.)
-
I can't select an Outlet: The Outlet may have reached its upload limit for the current period. Contact your Group administrator to request an increase or wait until the next period.
-
My media files won't upload: Check that your files are under 200 MB and in a supported format. Try uploading one file at a time if you're having trouble with multiple files.
-
The rich text editor isn't working: Try refreshing the page. If pasting from Word or another application, try pasting as plain text first (Ctrl+Shift+V or Cmd+Shift+V).
-
I need to edit a story after uploading: Go to the story page and click Edit to make changes. You can update any field, including adding or removing media.
Note
Stories can only be edited by Users who are either Admins in the story's Group or Users who are associated with one of the Outlets that published the story. All edits are tracked and published on the story preview page.
-
I uploaded to the wrong Group: You'll need to delete the story and re-upload it to the correct Group. Stories cannot currently be moved between Groups.
-
Still stuck? Contact your Group administrator for permission and policy issues, or email support@pluckyworks.org for technical problems.