How to Manage Outlets
Add, edit, and remove Outlets — the partner newsrooms that share stories in your Group — and control which of them are allowed to upload.
Looking for a different settings tab?
For Users and roles, see How to Manage Members. For the General tab, see How to Configure Group Settings. For Licenses, see How to Manage Content Licenses. For Tags, Series, and Boilerplates, see How to Manage Tags, Series, and Boilerplates.
Before You Begin
You must be a Group administrator to follow this guide. Outlet members without admin permission won't see the settings described below — ask your Group administrator if you're not sure which role you have.
You will need:
- A Group you administer (see How to Start a Group)
The Outlets tab is divided into two areas: a Pending Outlets section that appears only when there are Outlets awaiting Plucky Wire staff verification, and a table of every active Outlet in the Group. New Outlets created through this page must be verified by staff before their members can upload stories — verification typically takes 1–2 business days.
Instructions
Open the Outlets Tab
-
Go to Settings (https://wire.pluckyworks.org/settings/) and select your Group from the sidebar.
-
Click the Outlets tab.
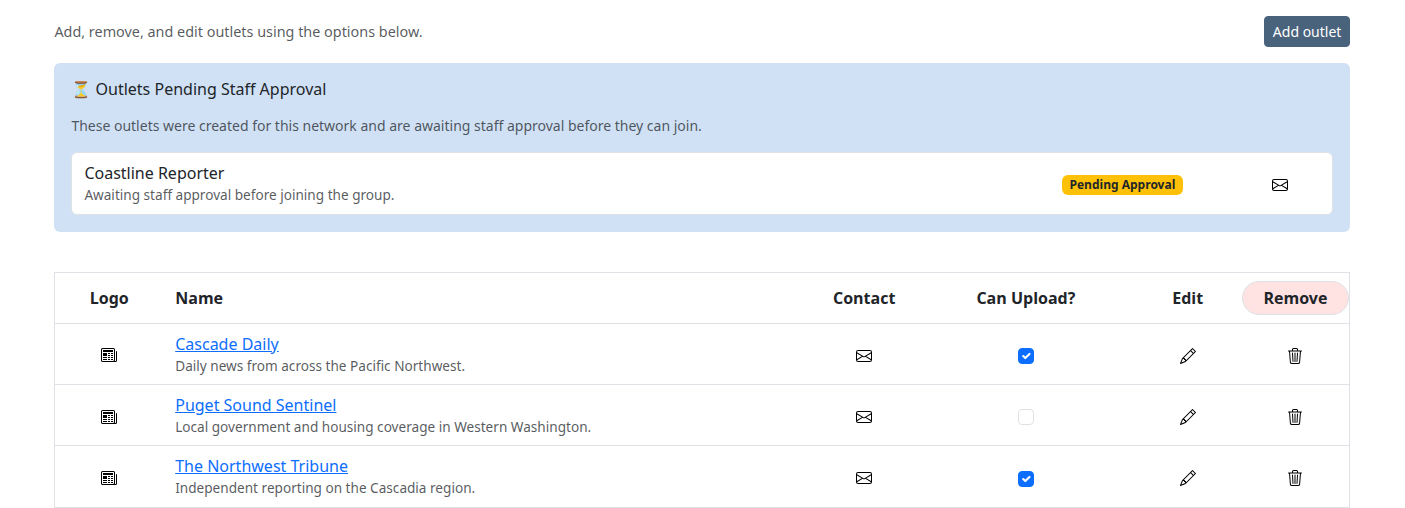
The page shows two areas:
- Pending Outlets — labeled Outlets Pending Staff Approval in the UI. Appears only when at least one Outlet is awaiting verification. Pending Outlets sit in the Group but cannot upload stories until Plucky Wire staff verifies them.
- Active Outlets — a table listing every verified Outlet, with columns for logo, name, contact email, an optional Can Upload? checkbox, and edit and remove icons.
Add an Outlet
You can add an Outlet that is already on Plucky Wire, or create a brand-new one. Both paths start from the same button.
-
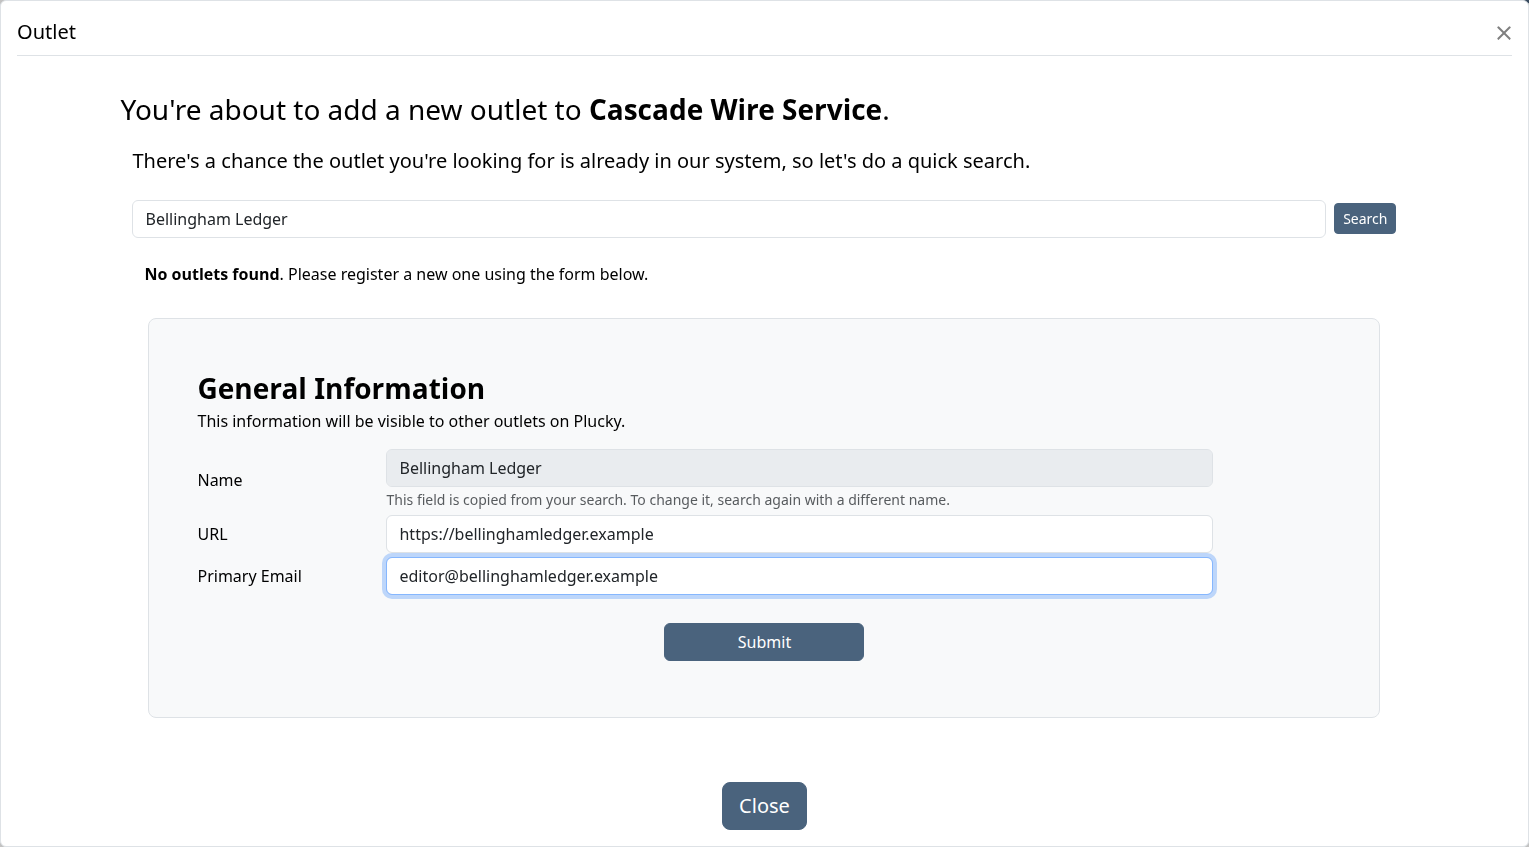
In the Outlets tab, click Add outlet. A pop-up window — called a modal — opens.
-
Type the Outlet's name in the search box and press Enter (or click Search).
-
Pick the path that matches your situation:
- The Outlet is already on Plucky Wire. It appears in the search results table with its name, website, and primary email. Click Send Invite in that row. The button changes to confirm the invitation was sent. The Outlet's administrators see the request on their Membership Requests page and can accept or decline.
-
The Outlet does not exist yet. When the search returns no results, a short create form replaces the results table. Fill it out:
Field Required? What to enter Name Required The Outlet's name. The form pre-fills this from your search; to change it, close the form and search again with a different term. URL Optional A link to the Outlet's website. Primary Email Required A contact email for the Outlet. Plucky Wire uses this to reach the Outlet during verification and for administrative notifications.
Click Submit. The Outlet is created and appears in the Pending Outlets section.
Warning
Newly created Outlets cannot upload stories until Plucky Wire staff verifies them. Verification typically takes 1–2 business days. Existing Outlets join your Group only after their administrators accept the invitation.
Note
To add finer details to a new Outlet — description, logo, additional Users — wait until verification finishes, then use Edit an Outlet below.
Edit an Outlet
-
In the active-Outlets table, click the pencil icon next to the Outlet you want to edit.
-
A modal opens with the Outlet's current details. Update any of the fields:
Field Required? What to enter Logo Optional An image that represents the Outlet. Appears on the Outlet's profile and in story listings. Upload a new file or click Delete next to the current thumbnail to remove it. Name Required The display name shown to other Outlets in the Group. URL Optional A link to the Outlet's website. Description Optional A short paragraph describing what the Outlet covers. Primary Email Required The contact email for the Outlet. -
Click Save & Refresh.
Note
The pencil icon is hidden for self-managed Outlets — Outlets that have their own administrators on Plucky Wire. Those administrators manage the Outlet's details from their own settings page. If you don't see the pencil, the Outlet is self-managed; ask one of its administrators to make the change.
Control Upload Permissions
If your Group has Limit Uploads to Selected Outlets enabled in the General tab, a Can Upload? column appears in the active-Outlets table. Use it to decide which Outlets are allowed to contribute stories.
-
Find the Outlet's row in the table.
-
Check the box in the Can Upload? column to allow uploads. Uncheck it to revoke upload access.
The change saves automatically and takes effect the next time the affected Outlet's members reload the upload page.
Warning
Unchecking Can Upload? immediately stops every User at that Outlet from uploading new stories to your Group. Their previously uploaded stories are not affected. If you're tightening permissions across multiple Outlets, tell affected partners in advance — otherwise their next upload attempt will fail with no warning.
Info
The Can Upload? column only appears when Limit Uploads to Selected Outlets is ON in the General tab. If you don't see the column, every Outlet in your Group can upload by default. To change that, see How to Configure Group Settings → Configure Content Sharing Rules.
Remove an Outlet
Removing an Outlet ends its membership in your Group. Use this when a partner withdraws from the collaborative or you no longer want their content in the Group.
-
In the active-Outlets table, click the trash icon next to the Outlet you want to remove.
-
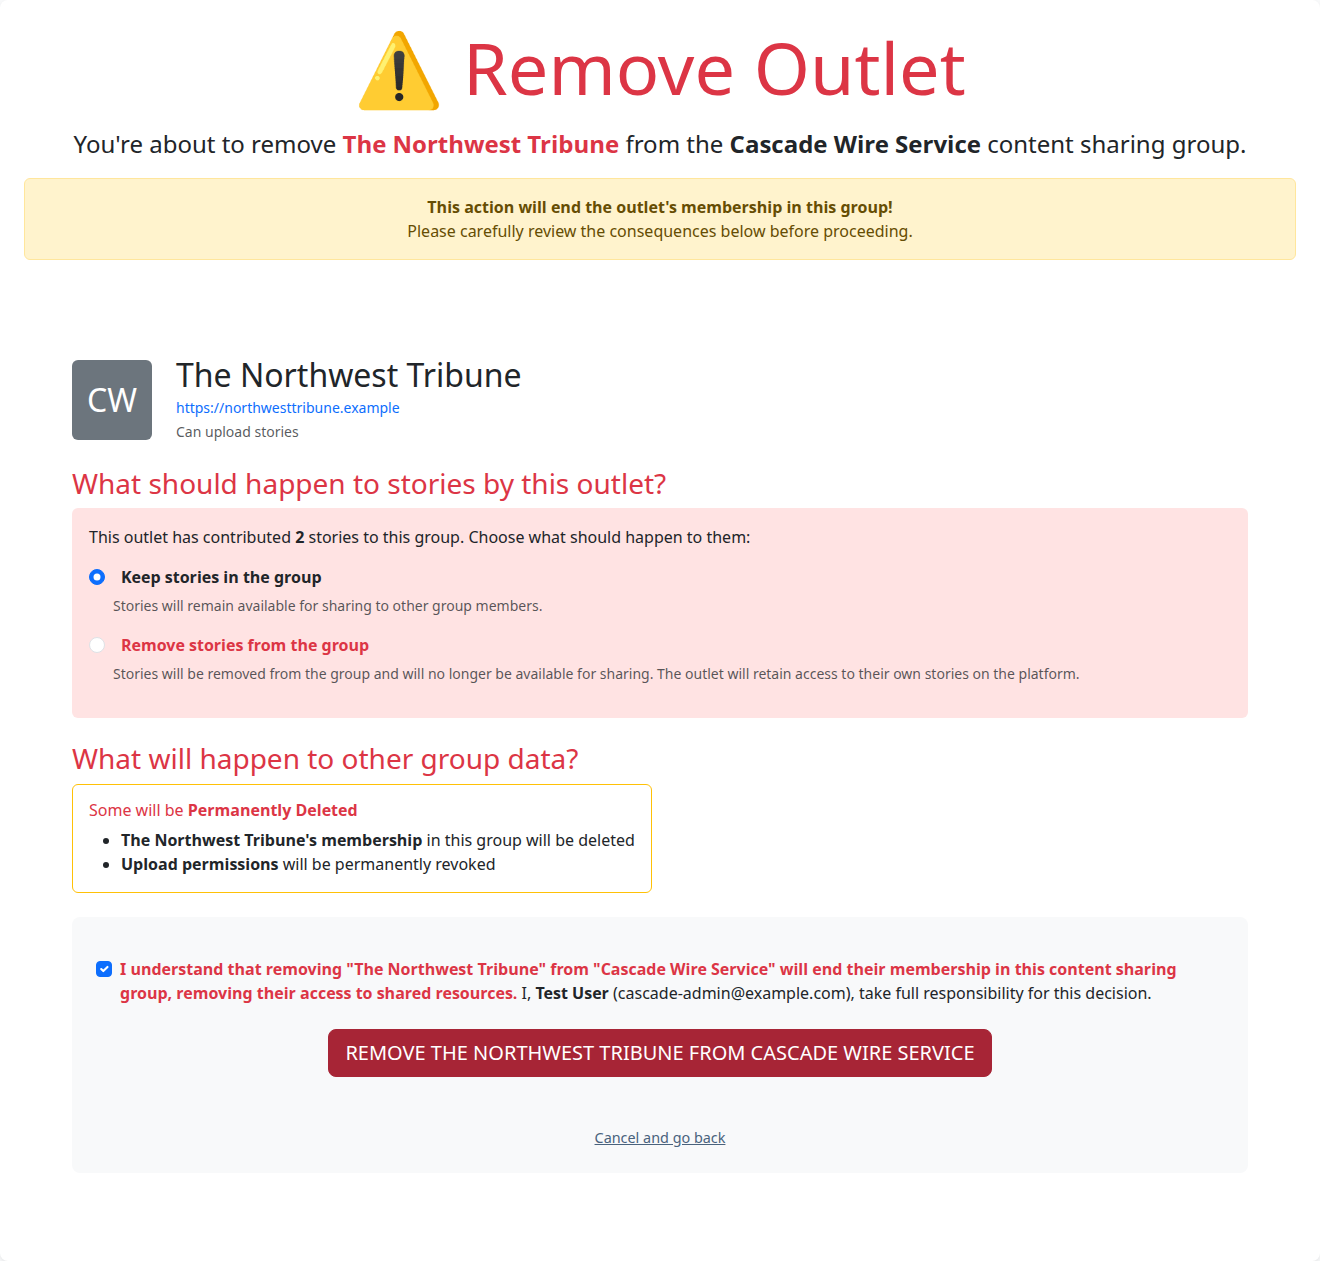
A confirmation page opens. If the Outlet has contributed stories, you must choose what happens to them:
- Keep stories in the Group. The Outlet leaves, but its stories remain available to the rest of the Group.
- Remove stories from the Group. The Outlet's stories are pulled out of the Group along with the Outlet itself. The Outlet keeps the original stories on its own account.
-
Read the consequences listed on the page, then check the box confirming you understand and accept responsibility.
-
Click the red REMOVE [OUTLET] FROM [GROUP] button.
Warning
Removing an Outlet revokes Group access for every User at that Outlet the next time they reload Plucky Wire. The Outlet itself continues to exist on Plucky Wire and keeps its own stories — only the Group membership is ended. There is no undo: to bring the Outlet back, follow Add an Outlet and have its administrators re-accept the invite.
What Happens Next
Outlet changes ripple to other people in your Group:
- Members of an Outlet you just added see the Group in their navigation and can start uploading stories the next time they reload — but only after Plucky Wire staff verifies the Outlet (typically 1–2 business days). Until then, the Outlet sits in the Pending Outlets section.
- Members of an Outlet you removed lose access to your Group's stories the next time their browser reloads. They keep their account and any other Group memberships.
- Other Group administrators see your changes the next time they open the Outlets tab.
- Uploaders at any Outlet whose Can Upload? checkbox you toggled see the upload form change the next time they open it. If you unchecked the box, the upload page shows them a "not permitted" message instead of the form.
- Stories already in the Group stay where they are — except when you choose Remove stories from the Group during an Outlet removal, in which case those specific stories leave with the Outlet.
Most actions on this page are reversible. Adding an Outlet, toggling upload permissions, and editing details can all be undone in the same place. The two exceptions: a removed Outlet must be re-invited and re-accepted to come back, and the Remove stories from the Group option during removal cannot be reversed for the affected stories.
Next Steps
- How to Manage Members — Invite Users to your Group and assign roles
- How to Manage Content Licenses — Configure the Licenses uploaders can choose from
- How to Configure Group Settings — Set sharing rules, including the upload-permission toggle
- How to Set Up Email Digests — Keep partners engaged once stories start flowing
Troubleshooting
-
An Outlet is stuck in the Pending Outlets section: New Outlets must be verified by Plucky Wire staff. Verification typically takes 1–2 business days. If it's been longer, email support@pluckyworks.org.
-
I can't see the pencil icon for an Outlet: That Outlet is self-managed — it has its own administrators who control its details. Ask one of them to make the change.
-
I don't see the Can Upload? column: The column only appears when Limit Uploads to Selected Outlets is ON in the General tab. See How to Configure Group Settings → Configure Content Sharing Rules.
-
The Add outlet button doesn't seem to do anything: A pop-up modal should open. If it doesn't, check that your browser isn't blocking pop-ups for https://wire.pluckyworks.org and try again.
-
An Outlet I added isn't showing up in the table: If you invited an existing Outlet, it stays out of the table until its administrators accept the invitation. If you created a new Outlet, it appears in the Pending Outlets section until staff verifies it.
-
An Outlet I removed still has stories in the Group: That happens when you chose Keep stories in the Group on the confirmation page. The stories remain available to the rest of the Group. To pull them out as well, you'd need to delete each story individually — there is no bulk option.
-
Still stuck? Email support@pluckyworks.org, or ask any other Owner of your Group if there is one.