How to Configure Group Settings
Configure your Group's General tab — the public-facing details, content sharing rules, notification preferences, and advanced features that shape how every Outlet and User in your Group experiences Plucky Wire.
Looking for a different settings tab?
The General tab is one of nine tabs on the Group settings page. For Users and roles, see How to Manage Members. For Licenses, see How to Manage Content Licenses. For Tags, Series, and Boilerplates, see How to Manage Tags, Series, and Boilerplates. For email digests, see How to Set Up Email Digests.
Before You Begin
You must be a Group administrator to follow this guide. Outlet members without admin permission won't see the settings described below — ask your Group administrator if you're not sure which role you have. Some settings on this page are restricted further to Group Owners; those are flagged inline.
You will need:
- A Group you administer (see How to Start a Group)
The General tab is divided into five sections — Public Info, Content Sharing Rules, Notifications, Invite Links, and Advanced Settings — plus a Danger Zone visible only to Group Owners. Each section has its own Save & Refresh button; you must click it to persist changes in that section before moving on.
Instructions
Open the General Tab
-
Go to Settings (https://wire.pluckyworks.org/settings/) and select your Group from the sidebar.
-
The General tab is selected by default. If you've navigated away, click General in the row of tabs at the top.
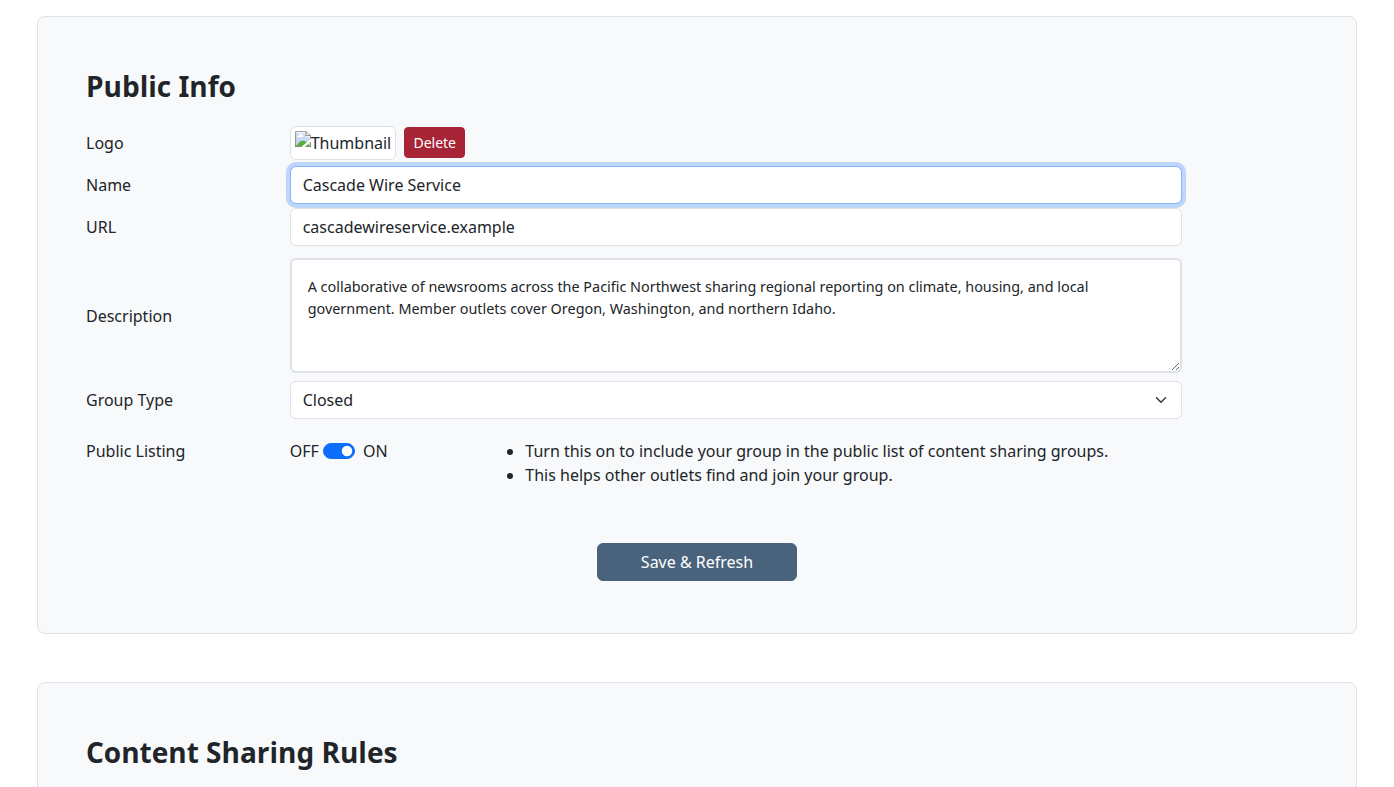
Update Public Info
The Public Info section controls how your Group appears in navigation, in the public Group directory (if you list it), and on your Group's profile page.
| Field | Required? | What to enter |
|---|---|---|
| Logo | Optional | An image that represents your Group. Appears in the sidebar and on your Group's public profile. See Upload or Replace the Logo below. |
| Name | Required | The display name for your Group. Appears in navigation, search results, and on your public profile. |
| URL | Optional | A link to your Group's website. Appears on your public profile if your Group is publicly listed. |
| Description | Optional | A paragraph explaining your Group's mission, coverage area, or membership criteria. Basic HTML formatting (bold, italics, lists) is preserved. |
| Group Type | Required | Choose Open or Closed. Open means any verified Outlet can join immediately. Closed means a Moderator or Owner must approve each request before the Outlet is added. |
| Public Listing | Optional | Toggle ON to include your Group in the public directory at https://wire.pluckyworks.org/explore/. When ON, anyone can find your Group and request to join. When OFF, your Group is only reachable by direct invitation or a signup link. |
After making changes in this section, click Save & Refresh at the bottom of the Public Info card.
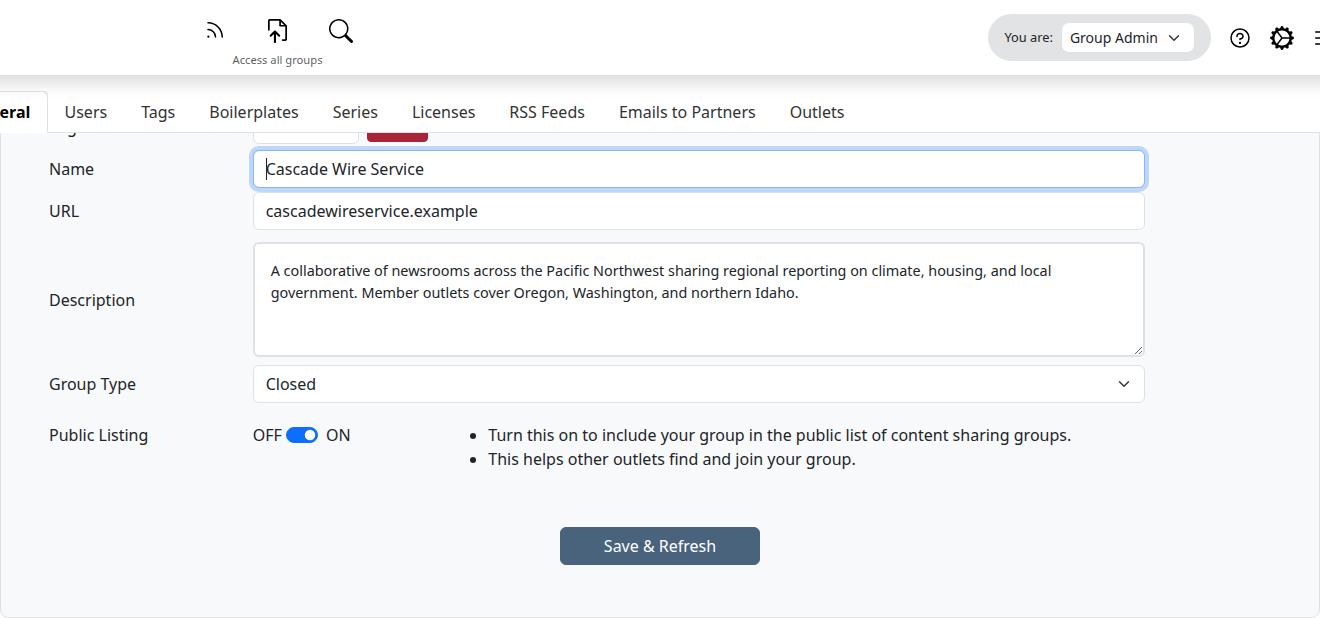
Warning
Switching Group Type from Open to Closed does not affect Outlets already in your Group, but every new join attempt from then on will require admin approval. Switching from Closed to Open means future Outlets are added the moment they click join — there is no review step. Make sure your Group's intended membership criteria match the new mode before switching.
Tip
When Public Listing is ON, a shareable profile link appears in the Invite Links section further down the page. You can copy and share that link in emails, on your website, or in outreach materials.
Upload or Replace the Logo
-
In the Public Info section, find the Logo row.
-
Click the file picker and select a PNG, JPG, or GIF.
-
Click the Upload button that appears next to the file picker. The thumbnail updates once the upload finishes.
-
To replace an existing logo, click Delete next to the current thumbnail, then repeat steps 2 and 3 with the new file.
The logo upload is a separate save from the rest of the Public Info section — you do not need to click Save & Refresh for the upload itself. You do need to click Save & Refresh to persist any other edits you've made in the Public Info card.
Configure Content Sharing Rules
The Content Sharing Rules section governs which Licenses are available, who can upload, and whether photos can be uploaded or browsed independently.
| Field | Required? | What to enter |
|---|---|---|
| Use Standard Licenses | Required | Toggle YES to limit uploads to widely recognized Licenses (Creative Commons and a few others). Toggle NO to allow custom Licenses your Group has created. See How to Manage Content Licenses. |
| Default License | — | Display only. Shows the License pre-selected on the upload form. To change it, go to the Licenses tab. |
| Limit Uploads to Selected Outlets | Required | Toggle YES to restrict uploading to specific Outlets only. Toggle NO to let every Outlet in the Group upload. When YES, control which Outlets have permission in the Outlets tab. |
| Allow Photo Uploads | Required | Check the box to let Users attach images to their stories and to include photos in RSS imports. Uncheck to block new photo uploads (existing photos remain). |
| Allow Photo Browser | Required | Check the box to enable the photo search mode on the search page, letting Users browse photos independently of stories. Uncheck to hide that mode. |
After making changes in this section, click Save & Refresh at the bottom of the Content Sharing Rules card.
Warning
Changes here apply to every Outlet and every User in your Group the next time they reload Plucky Wire. Tightening Limit Uploads to Selected Outlets can immediately revoke a partner's ability to upload — tell affected Outlets in advance. Toggling Use Standard Licenses changes which Licenses appear on the upload form for everyone.
Note
Consider keeping Allow Photo Browser off until your Group has a clear understanding of how photo licensing works among its members. Some Outlets may have never shared photos independently of their stories, and others may have freelance photography agreements that restrict redistribution. Sorting out these details before enabling the photo browser helps avoid confusion or accidental misuse.
Configure Notifications
The Notifications section sets the email address Plucky Wire uses to reach Group administrators, and controls whether downloaders are notified about edits.
| Field | Required? | What to enter |
|---|---|---|
| Primary Email | Required | The address where your Group receives administrative notifications — new membership requests, moderation alerts, and other admin emails. |
| Edit Alerts | Required | Toggle ON so that any User who downloaded a story is emailed when the original Outlet later edits it. Useful for republishing newsrooms that need to stay in sync with corrections. Users still need to opt in individually from their own settings. |
After making changes in this section, click Save & Refresh at the bottom of the Notifications card.
Warning
Turning Edit Alerts ON enables the email pipeline for the entire Group. Whether any specific User actually receives those emails still depends on their own opt-in choice in their account settings, but the toggle here is the master switch. Turning it OFF later silences edit alerts for every Outlet in the Group.
Use Invite Links
The Invite Links section gives you two ways to bring new partners into your Group:
-
Public profile link. When Public Listing is ON (set in the Public Info section above), a copy-ready link to your Group's profile page appears here. Share it on your website or in outreach emails so journalists can learn about your Group and start the registration flow.
-
Direct sign-up links. Click Generate New Invite Link to create a shareable link that lets a newsroom skip parts of the normal verification flow. Use these only with Outlets you know and trust. Each link can have its own expiration and can be deactivated independently.
For the full how-to on creating, editing expirations, and deactivating signup links, see How to Manage Members → Create a Signup Link.
Configure Advanced Settings
The Advanced Settings section turns on two optional features: a tracking pixel that reports back when republished stories are viewed, and an automatic Google Drive backup of every story uploaded to your Group.
| Field | Required? | What to enter |
|---|---|---|
| Page View Tracking | Optional | Toggle ON to give Users a tracking pixel — a tiny invisible image — that they can paste into the published version of any downloaded story. When the republished story is viewed, the pixel reports back so the original author can see download-to-view conversion. Installation depends on the republishing newsroom's CMS. |
| Google Backups | Optional | Toggle ON, then connect a Google Drive folder to receive a copy of every story uploaded to your Group. See Connect a Google Drive Backup below. |
After making changes in this section, click Save & Refresh at the bottom of the Advanced Settings card.
Connect a Google Drive Backup
-
Toggle Google Backups to ON. A folder-ID input appears below.
-
In Google Drive, create the folder you want backups copied into.
-
Share that folder with
johnny@pluckyworks.org, granting Editor access. -
Copy the folder ID from the Google Drive URL — it's the string after
/folders/— and paste it into the input box on the settings page. -
Click Verify. Plucky Wire will check that the Plucky Works service account can write to the folder. On success, the input is replaced with a confirmation reading "You're all set!"
-
Click Save & Refresh at the bottom of the Advanced Settings card.

To disconnect, click Reset next to the verified folder ID, then Save & Refresh. Stories already backed up to Google Drive remain in the folder.
Info
The folder must be shared with johnny@pluckyworks.org before verification will succeed. If you're not sure how to grant Editor access to a Google Drive folder, follow Google's share-with-specific-people instructions.
Delete the Group (Owners Only)
If you're a Group Owner, a Danger Zone card appears at the bottom of the General tab with a Delete Network button.
Warning
Deleting a Group is permanent and cannot be undone. Every story in the Group, every Outlet membership, and every settings record is removed. Users keep their accounts but lose access to whatever this Group contained. Export anything you need to keep before clicking the button.
-
Scroll to the Danger Zone card at the bottom of the General tab.
-
Click Delete Network.
-
Follow the prompts on the confirmation page to finalize the deletion.
What Happens Next
Most General-tab changes apply immediately the next time another User reloads a relevant page:
- Group administrators see updates to Public Info, Group Type, and Public Listing the next time they open Group settings or the public directory.
- Outlet members in your Group see new sharing rules — Use Standard Licenses, Limit Uploads to Selected Outlets, Allow Photo Uploads — the next time they open the upload page or the photo browser.
- Users who have opted in to edit alerts start (or stop) receiving those emails as soon as Edit Alerts is toggled.
- External viewers see your Group on the public directory at https://wire.pluckyworks.org/explore/ once Public Listing is ON, and stop seeing it the moment you toggle it OFF.
- Republishing Outlets that paste a tracking pixel into their CMS start reporting page views back to authors as soon as Page View Tracking is ON and at least one downloaded story carries the pixel.
- Newly uploaded stories start syncing to your Google Drive folder once Google Backups is connected and saved. Stories uploaded before then are not retroactively backed up.
Most settings on this page are reversible — toggle, save, watch what happens, and adjust. The two exceptions: deleting the Group is permanent, and a new logo replaces the previous file rather than archiving it.
Next Steps
- How to Manage Members — Invite Users, change roles, and create signup links
- How to Manage Outlets — Add and configure Outlets, including upload permissions
- How to Manage Content Licenses — Configure the Licenses uploaders can choose from
- How to Set Up Email Digests — Keep partners engaged with automated story emails
Troubleshooting
-
I don't see a Group in the settings sidebar: You need a Moderator or Owner role to see Group settings. Ask your Group's existing administrators to check your role on the Users tab.
-
My logo upload isn't working: Ensure the image is a common format (PNG, JPG, or GIF) and not unusually large. Try a smaller file. If the upload still fails, check your browser console for errors and email support@pluckyworks.org.
-
I clicked Save & Refresh but nothing seemed to happen: The page reloads silently when changes save successfully. If a red error banner appears at the top of the section, read the field-by-field error list — usually a required field was emptied or a URL is malformed.
-
Google Backups verification fails: Confirm the Google Drive folder is shared with
johnny@pluckyworks.orgwith Editor access, that the folder ID in the input matches the one in the Drive URL, and that the folder hasn't been moved or deleted. Email support@pluckyworks.org if it still won't verify. -
I can't find the Delete Network button: Only Group Owners see the Danger Zone card. Moderators do not have permission to delete a Group. Ask an Owner to do it, or to promote you to Owner first (How to Manage Members → Change a Member's Role).
-
Still stuck? Email support@pluckyworks.org, or ask any other Owner of your Group if there is one.