How to Set Up Email Digests
Configure the Emails to Partners tab on Group settings — both the regularly-scheduled email digest that summarizes recent stories for every Outlet in your Group, and the one-off announcement emails you send between digests.
Looking for a different settings tab?
For Users and roles, see How to Manage Members. For the General tab, see How to Configure Group Settings. For Licenses, see How to Manage Content Licenses. For Tags, Series, and Boilerplates, see How to Manage Tags, Series, and Boilerplates.
Before You Begin
You must be a Group administrator to follow this guide. Outlet members without admin permission won't see the settings described below — ask your Group administrator if you're not sure which role you have.
You will need:
- A Group you administer (see How to Start a Group)
The Emails to Partners tab has two independent areas. The Manual Emails area at the top sends a one-off announcement to every User in your Group. The Scheduled Email Digests area below it controls the recurring digest — its schedule, recipients, content, and a few preview-and-test tools. Every digest goes out to every User at every Outlet in your Group, plus any additional recipients you've added — that audience is wide, so save and preview before you send.
Instructions
Open the Emails to Partners Tab
-
Go to Settings (https://wire.pluckyworks.org/settings/) and select your Group from the sidebar.
-
Click the Emails to Partners tab.
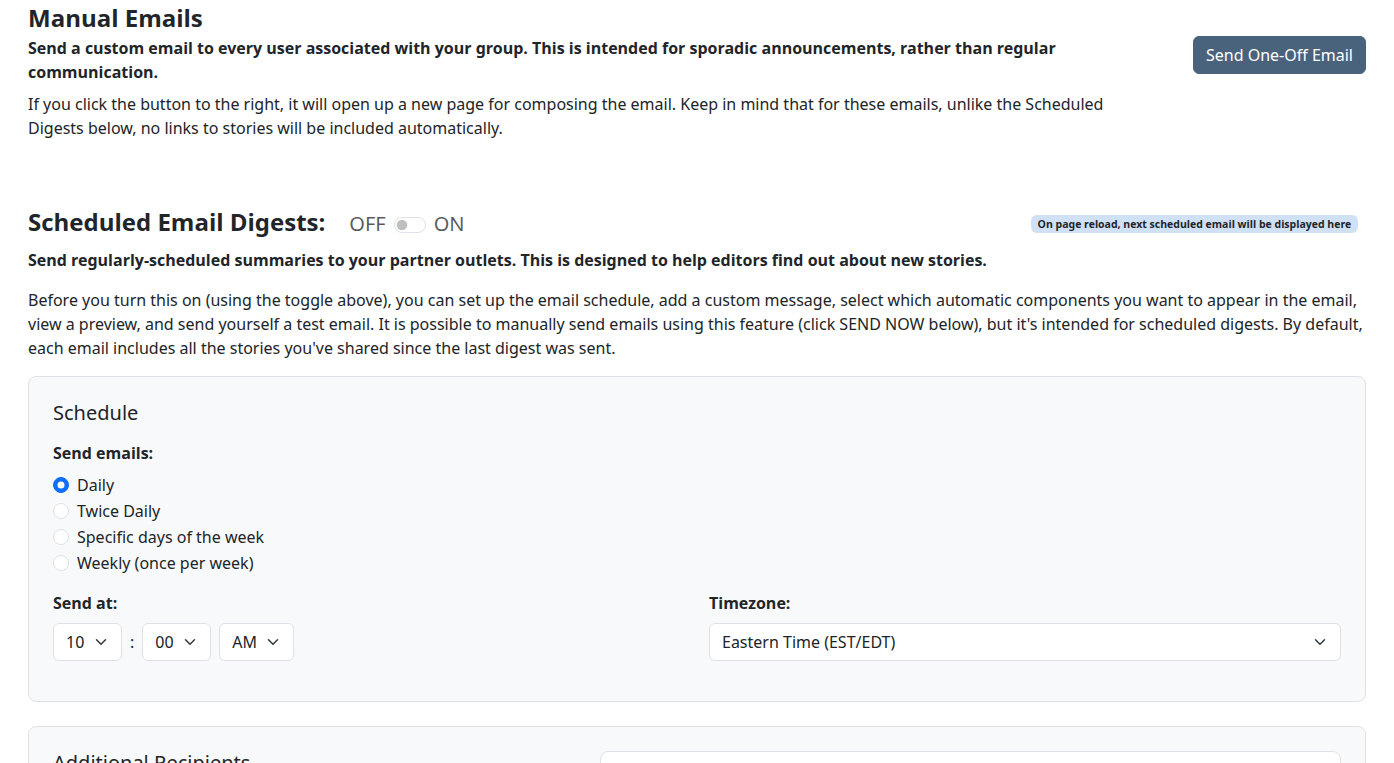
The page shows two areas, top to bottom:
- Manual Emails — a single button that opens a separate composer for one-off announcements with no story links attached.
- Scheduled Email Digests — the digest configuration form, with sections for the schedule, additional recipients, email content, and the action buttons (Preview, Send Test, Save, Send Now) at the bottom.
Send a One-Off Announcement
If you want to send a single email to every User in your Group without the standard digest sections — for example, an outage notice, a kickoff announcement, or a one-time invitation — use the Manual Emails area at the top of the tab.
-
In the Manual Emails area, click Send One-Off Email. A separate composer page opens.
-
Compose your message and send.
One-off emails do not include automatic story links, weekly statistics, or any of the other digest sections. They go to every User in your Group.
Warning
A one-off email reaches every User at every Outlet in your Group. Use it sparingly — it bypasses the digest's preview and test-email tools, so once you click send there is no recall.
Enable or Disable Digests
The ON/OFF toggle to the right of the Scheduled Email Digests heading controls whether digests are sent on the schedule below. When the toggle is ON, the page shows a status line on the right reading "Your next email will be sent in X hours" (or similar). When OFF, the schedule is paused and no automated emails are sent — but you can still use Send Now for a one-off blast under the same template.
-
Find the Scheduled Email Digests heading near the top of the form.
-
Click the ON/OFF toggle — a switch — to the right of the heading.
-
Scroll to the bottom and click Save Changes.
Warning
Turning the toggle ON commits the digest to the schedule below. Confirm the Schedule, Email Content, and Additional Recipients sections are correct first — every User at every Outlet in your Group will receive the digest the next time the schedule fires. Turning it OFF stops the next scheduled send immediately, but does not affect a digest already in flight via Send Now.
Set the Schedule
The Schedule section at the top of the form controls when the digest is sent. You can change these settings later — pick a cadence that matches when your members tend to plan their day.
| Field | Required? | What to enter |
|---|---|---|
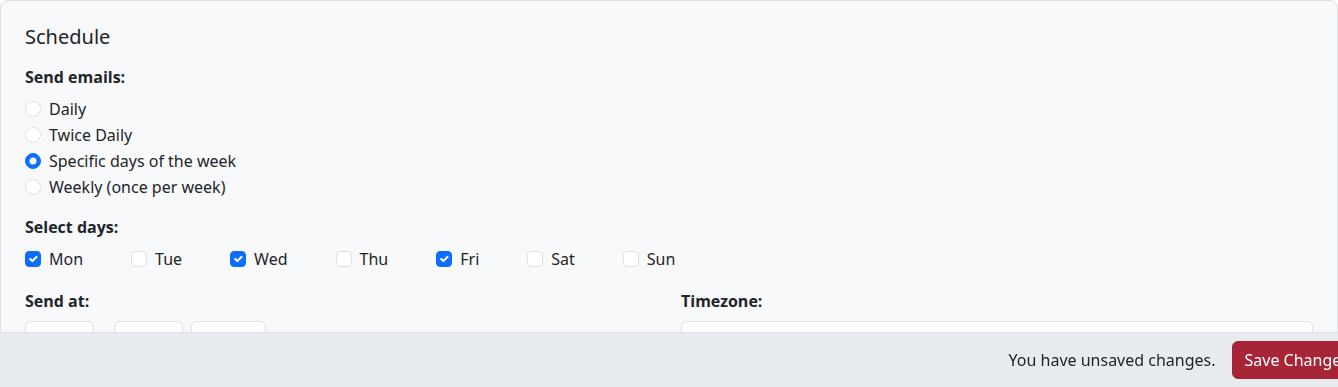
| Send emails (frequency) | Required | Pick one of four options: Daily (once per day), Twice Daily (two sends per day at two different times), Specific days of the week (pick one or more days), or Weekly (once per week) (pick a single day). |
| Select days | Required (Specific days only) | When Specific days of the week is selected, check at least one of Mon, Tue, Wed, Thu, Fri, Sat, Sun. Other frequencies hide this row. |
| Select day | Required (Weekly only) | When Weekly is selected, pick a single day from the dropdown. Other frequencies hide this row. |
| Send at / First send time | Required | Three dropdowns — hour (1–12), minute (00, 15, 30, 45), and AM/PM — set the daily send time. Labelled First send time when Twice Daily is selected. |
| Second send time | Required (Twice Daily only) | Three matching dropdowns for the second daily send. Other frequencies hide this row. |
| Timezone | Required | The timezone for your send time. Available timezones: Eastern (EST/EDT), Central (CST/CDT), Mountain (MST/MDT), Arizona (MST, no DST), Pacific (PST/PDT), Alaska (AKST/AKDT), and Hawaii (HST). |
After making changes here — and in every section below — scroll to the bottom and click Save Changes.
Tip
Choose a send time that aligns with your members' editorial schedules. Many Groups find that early morning sends (7:00 or 8:00 AM in their timezone) work well, giving editors time to review available stories before their morning planning meetings.
Warning
Changing the schedule of an enabled digest takes effect immediately — the next send time recalculates as soon as you save. If you've announced a regular delivery time to partners, give them a heads-up before changing it.
Manage Additional Recipients
Every User at every Outlet in your Group receives the digest automatically. The Additional Recipients section lets you add up to 300 outside email addresses on top of that — useful for funders, board members, partner editors who don't have Plucky Wire accounts, or anyone else you want to keep in the loop.
The section has two sub-tabs — Single for one address at a time, and Bulk Import for pasting many at once — plus the live list on the right.
Add a Single Recipient
-
In the Additional Recipients section, click the Single tab if it isn't already active.
-
Type the email address into the input.
-
Click Add. The address appears as a badge — a small labeled tag — in the recipient list on the right.
Add Multiple Recipients at Once
-
Click the Bulk Import tab.
-
Paste a list of email addresses, separated by commas, semicolons, or new lines.
-
Click Add Emails. Valid addresses are added; any invalid ones are reported in a message below the input.
Remove a Recipient
To remove a single recipient, click the small X on its badge. A browser confirmation prompt asks "Remove email@example.com from digest recipients?" Click OK to confirm.
To remove every additional recipient at once, click Remove All above the badge list. A browser confirmation prompt asks "Are you sure you want to remove all additional email recipients? This action cannot be undone." Click OK to confirm.
Info
The cap on additional recipients is 300. The list does not count Group members — only addresses you've added explicitly. Additional recipients receive the same digest as Group members, with an extra unsubscribe link at the bottom of the email.
Note
Group members who want to stop receiving the digest unsubscribe through their own account email preferences, not from this list. Additional recipients (people not in the Group) can unsubscribe through the link in the email — that removes them from this list automatically.
Configure Email Content
The Email Content section controls what every recipient sees, top to bottom: the subject line, your custom message, an optional discovery section, and which standard sections appear in the body.
| Field | Required? | What to enter |
|---|---|---|
| Subject Line | Required | Up to 200 characters. A counter below the input shows characters used. To let Plucky Wire generate the subject for each send, check Auto-generate subject based on new stories since the last send below the input. See Use an Auto-Generated Subject Line. |
| Custom Message | Optional | A rich text editor — a formatting toolbar above an editing area — for an introductory message that appears at the top of the digest, above the automated sections. Use it for announcements, reminders, or context about the stories being shared. Leave empty to skip the introduction. |
| Include stories with open licenses from other networks | Optional | Check this box to add a discovery section to the digest with up to 5 recent stories from other Groups that use open, permissive Licenses. Helps your members find content from outside your Group. |
| Email sections | Required | Three checkboxes that pick which standard sections appear in the body — Show logo and branding, Show summary statistics (stories shared, views, downloads in the past week), and Show Most Downloaded Stories. The list of recent stories from your Group is always included. |
After making changes here, scroll to the bottom and click Save Changes.
What's automatically included in every digest
After your custom message, every digest shows a list of the 10 most recent stories from your Group. The other sections — logo and branding, summary statistics, most downloaded stories, and the discovery section — are toggled by the checkboxes above.
Use an Auto-Generated Subject Line
If you'd rather not rewrite the subject line for every send, Plucky Wire can build one for you from the stories included in each digest.
-
In the Email Content section, check Auto-generate subject based on new stories since the last send. The manual subject input is hidden, and two style options appear below.
-
Pick a style:
- By story count — the subject becomes a count-based summary (e.g. "5 new stories from your network"). An example preview appears beside the option.
- By top story headline — the subject becomes the headline of the most recent story. An example preview appears beside the option.
-
Scroll to the bottom and click Save Changes.
To go back to a hand-written subject, uncheck the auto-generate box. The manual input reappears with whatever you'd typed there last.
Preview the Email
Before saving, sending, or enabling, you can render the digest exactly as your recipients will see it. The preview reflects the current form state — including unsaved changes — so it's the right way to check a tweak before committing.
-
Scroll to the bottom of the digest form and click Preview Email. A pop-up window — called a modal — opens.
-
The modal renders the digest with your current settings and the latest stories from your Group. Scroll inside the modal to see every section.
-
Click Close Preview when you're done.
Tip
The preview uses real, current data: the stories that would be included in the next scheduled send, your live recipient list count, and the subject line as it will appear. If something looks wrong, fix it in the form and click Preview Email again.
Send Yourself a Test Email
A test email is a real send to your address only, so you can see exactly how the digest renders inside an email client (rather than in the browser preview modal).
-
Scroll to the bottom of the digest form and click Send Me a Test Email. The button shows a "Sending..." indicator while the email is queued.
-
A success alert appears confirming the test was queued.
-
Check your inbox — typically the test arrives within a few minutes. The subject line is prefixed with [TEST] so you can tell it apart from the real digest.
Tip
Send a test before enabling a new digest, before any major content or schedule change, and before clicking Send Now. The browser preview catches most issues, but the test catches a few — link rendering, image loading, dark-mode quirks — that only show up in a real email client.
Save Your Changes
Every section above shares one form and one save button. As soon as you change any field, a sticky bar appears at the bottom of the screen reading "You have unsaved changes" with a Save Changes button — that's the same button as the Save Changes at the bottom of the form, surfaced for convenience.
-
Click Save Changes (either in the sticky bar or at the bottom of the form).
-
The bar updates to "Settings updated!" briefly, then disappears.
If a field has an error, a red message appears next to the field and the form does not save. Fix the field and click Save Changes again.
Send a Digest Immediately
If you need to push the digest out right now — outside the schedule — the Send Now button at the bottom of the form does that. It uses your current saved content; unsaved changes are not included.
-
Save and preview your changes first (see the two sections above).
-
Click Send Now at the bottom of the form. A browser confirmation dialog appears reading "You're about to send the current version of the digest to all recipients. We recommend saving and previewing the email before continuing. This action cannot be undone."
-
Click OK to confirm.
A confirmation message appears just above the button showing how many recipients the digest was queued for. Delivery typically takes a few minutes.
Warning
Send Now delivers the digest to every User at every Outlet in your Group, plus every additional recipient on the list — there is no second confirmation, no recall, and no undo. Always save and preview before clicking. If you're testing a draft, use Send Me a Test Email instead so it goes only to your address.
What Happens Next
Email-digest changes ripple to other people in your Group:
- Every User at every Outlet in your Group receives the digest the next time the schedule fires (or immediately, if you used Send Now). The subject line, sections, and discovery toggle all reflect what was saved at the time the digest was queued.
- Additional recipients you added receive the same email, with an unsubscribe link at the bottom. If they unsubscribe, their address is removed from the recipient list automatically.
- Group members can unsubscribe from their own email preferences. Unsubscribed members stop receiving the digest immediately.
- The next-send indicator on the Emails to Partners tab updates after every save to reflect the new schedule. If you disabled the digest, the indicator disappears.
- One-off announcements sent from Send One-Off Email reach every User in your Group as soon as the composer page submits — they do not wait for the schedule.
Most settings here are reversible — flip the toggle back, change the schedule, edit the content, save again. The two exceptions: a digest already delivered by Send Now or by the schedule cannot be recalled, and an additional recipient who unsubscribes is removed from the list and would need to re-add themselves (or be re-added) to start receiving digests again.
Next Steps
- How to Manage Members — Make sure your Group's membership is up to date so the digest reaches the right Users
- How to Configure Group Settings — Adjust your Group's general preferences
- How to Manage Outlets — Add or remove the partner Outlets whose Users receive the digest
- How to Find Stories — Review the stories your digest will feature
Troubleshooting
-
The digest isn't sending at the scheduled time: Confirm the ON/OFF toggle at the top of the Scheduled Email Digests area is ON, and that you clicked Save Changes after your last edit. Check the Timezone dropdown matches your Group's expected region — a mis-set timezone is the most common cause of a "wrong time" send.
-
The "Next email" indicator says the wrong time: Double-check the Timezone, the Send at time, and the Send emails frequency — including whether the right days are checked under Specific days of the week or the right day is selected for Weekly.
-
A recipient says they aren't getting the email: Ask them to check their spam folder first. For Group members, confirm they haven't unsubscribed from their own email preferences. For additional recipients, confirm the address in the badge list matches what they expect.
-
The Preview modal shows "Preview Error": The preview hit a server error, often because a required field is empty or the custom message contains malformed HTML. Save the form to surface field-level errors, fix what's flagged, and click Preview Email again.
-
"Send Me a Test Email" appears to do nothing: The test is queued asynchronously and may take a few minutes to arrive. If it still hasn't shown after 10 minutes, check your spam folder and confirm your account email address (under your account settings) is the one you're checking.
-
An additional recipient can't unsubscribe: Every digest email has an unsubscribe link at the bottom. If the link doesn't work for them, remove the address manually from the Additional Recipients list — that has the same effect.
-
I want to change the next digest's content: Edit the Email Content section and click Save Changes. The next scheduled send (and any Send Now) uses the latest saved content.
-
Still stuck? Email support@pluckyworks.org, or ask any other Owner of your Group if there is one.